Product overview
Get a complete view of the tools that power your business

Get a complete view of the tools that power your business
Let customers book and manage storage with ease

Manage your entire business in one place

Attract new customers with a website built for self-storage

Extend your business logic with endless integrations

Visualise your site occupancy, edit your sitemap and schedule move-ins and move-outs.

Jack Colemanzo
2025-11-10
Sitemaps are mandatory features of any serious self storage software. Other than being a visual representation of storage units, they help you better manage your facility.
Facility managers usually use them for:
Having a Quick View of the Key Storage Unit Metrics(eg. what specific units are available)
Checking Out Individual Storage Unit Status(eg. which units require repair)
Checking Up Tenant Status of the Occupied Unit (eg. did the tenant pay the invoice)
Scheduling Move-Ins or Move-Outs
Self storage automation saves you time and helps you manage your facility as efficiently as possible. This article will show you how to leverage sitemaps to improve and automate your self storage facility.
Sitemaps visualise the layout of your sites, and present key metrics (such as unit occupancy levels or unit labels). They also make it easy to schedule move-ins, move-outs, maintenance and repairs. So how do you make one for your facility?
Learn The Exact Steps on How To Set Up Your Self Storage Facility In This 5 Minute Read
Key Lessons from Industry Experts
The Psychology of Self-Storage Pricing
How to diversify your revenue streams
Steps to set you up for success
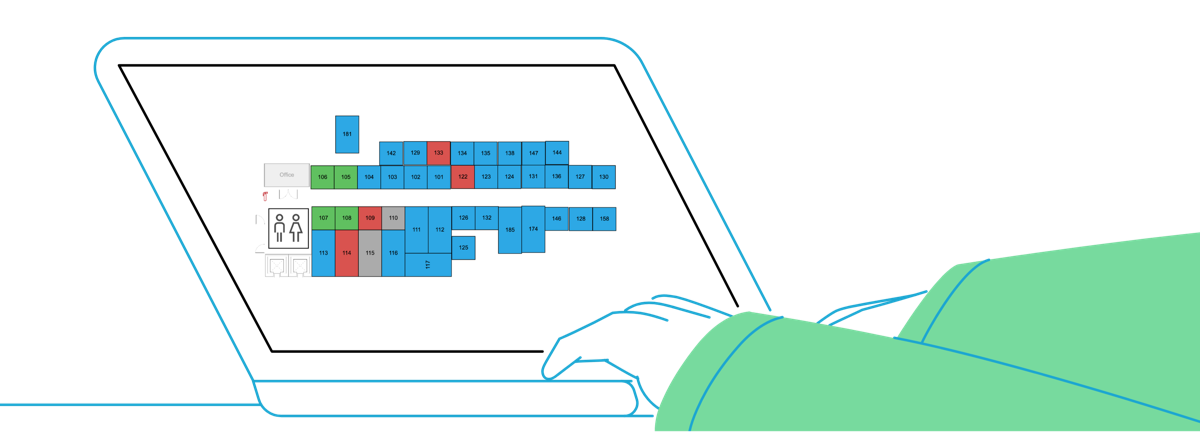
Creating a sitemap with Storeganise is super easy. Go to the dashboard, click on the site you’re interested in and click on the “sitemap” button. Drag and arrange units according to the layout of your self-storage facility.
See which units are vacant, occupied, reserved and blocked. This will allow you to easily see which units are available once a customer wants to book a unit. To view more information on a unit, such as unit type and customer move-in dates, click on the unit and a pop-up will appear.
Filter your unit according to customers, in order to see where a specific customer has their items. You can also filter by unit types, which you can set up and customise yourself in the main settings.
To schedule a move-in, you can filter by units available. Once a unit has been selected, you can click on the green ‘Schedule move-in’ button. Fill in the details, including the move-in date, a promo code and the customer to move-in.

To edit a sitemap, click on the pencil icon in the top right-hand corner, and drag and drop items on the sitemap according to your reference. Add objects such as doors, offices, stairs and toilets.

As said, sitemaps are a must-have feature of any self-storage software. Self-storage managers love to use them as they save time and make things run smoothly.
With Storeganise, creating, editing sitemaps or scheduling move-ins/move-outs is a breeze. Book a demo with us to learn more.

Jack Colemanzo is the Head of Sales at Storeganise, based in Barcelona. With a strong background in the technology industry, spanning software development, sales management, and team leadership, Jack is a catalyst for growth and a builder of positive team culture.
View bio